Creating your assistant
How to create an assistant yourself, what happens between "Create" and it answering a real customer, and why a brand-new one is switched off on every channel.
An assistant is one working personality with one job: the front desk that answers your phone, the salesperson who handles enquiries on WhatsApp, the one that calls people back a week later. Each has its own instructions, its own channels and its own test button.
You can create them yourself, from Bots in the dashboard. Nobody at Kooday has to be involved, and nothing you create can reach a customer by accident — a new assistant starts as a draft, switched off on every channel, and stays that way until you deliberately bring it live.
This page covers both halves: making a new one, and living with one you already have.
There is a second door, and on a brand-new account it is usually the better one. Set up by chat interviews you about the business and drafts the whole assistant — description, rules, catalogue and knowledge base — from the conversation, instead of leaving you an empty one to fill in. It is offered beside Create assistant on the Bots page and inside the dialog below. Both doors build the same thing, and both leave it switched off until you publish. If this account already has a Business profile, Set up by chat still builds the new assistant — its name, opening line, catalogue and knowledge base — and leaves that shared profile as it is. The result says so and links to the Business profile page. The first assistant on an empty account still fills the profile in from the conversation.
Where to find it: Bots, under Assistants in the left-hand menu. The page header reads “Select a bot to see its configuration and test it live in your browser — the same pipeline a real call runs through.”
The five-minute version
- Click Create assistant (top right).
- Pick a kind, type a name, click Create.
- Click Open studio, write what it should do in the Instructions pane, click Save draft, then Publish.
- It comes live by itself. Back on Bots, open the Readiness tab and click Validate setup to confirm.
That is a working assistant. Switching it on for real customers is the next section down, and it is a separate decision on purpose.
How many you can have
Your plan sets the number. Click Create assistant past that number and the dialog refuses with “Your plan’s assistant limit is reached” and a line telling you what you have:
Your plan includes 3 assistants and all are in use. Contact your administrator to add more.
Two things about that count:
- Drafts count, archived ones don’t. The number includes every assistant on the account that isn’t archived, live or not — an abandoned draft still occupies a slot, so tidy up before you assume you are capped. Archiving an assistant you no longer need frees its slot immediately; deleting it is not required.
- Only Kooday can raise it. There is no self-serve upgrade in the dialog — the refusal says “Contact your administrator” because that is genuinely the only route.
Step 1 — Create it
Create assistant opens a dialog that says exactly what it will do:
Pick what kind of assistant this is and give it a name. It starts as a draft — nothing goes live until you write and publish its instructions.
There are only two things to fill in.
The kind
Five tiles, and the choice sets its default manner — how it opens, how hard it pushes, what it does when it cannot help. Four are standard personas Kooday maintains and improves over time:
| Kind | Suits |
|---|---|
| Service desk | The front desk. Someone arrived with a specific need; answer it quickly and exactly. |
| Sales | Enquiries you want to convert. Direct, curious, confident — and not desperate. |
| Mentor | Teaching and guidance. Warm, unhurried, supportive rather than transactional. |
| Outbound follow-up | Reaching people who did not ask you to get in touch. Brief and deliberately unpushy. |
The fifth, Start blank, works differently: no preset persona at all. Its manner comes entirely from what you write in the instructions pane, with nothing to fall back on. Use this only if you plan to write a fairly complete personality yourself; a blank assistant that goes live with no instructions has no voice at all, and the Persona tab (below) will say so.
Pick by the job, not by the department. A clinic’s reception line is a Service desk even though bookings are revenue.
Copying instead of starting fresh. Select a standard persona and two more options appear: Preview prompt (read the real text behind it before you commit) and Copy this persona instead. There is also a standalone Or copy one of your own personas… link, for starting from a copy you already made on another assistant without picking a standard persona first. Either way, the copy becomes a new persona of your own, and — unlike making a copy later from the assistant’s Persona tab — it is ready to use immediately; you don’t have to publish it separately first. A copy stops receiving Kooday’s improvements to whichever persona it came from; see Choosing how your assistant sounds for the full trade.
You are not locked in. The assistant’s Persona tab lets you switch to any standard persona, or to any of your own copies, at any time — so if you are torn between Service desk and Sales, it costs you a click to change your mind later, not a rewrite.
The name
Type what your team will call it — Front Desk, Reception, Sales. Up to 80 characters. It is used verbatim in the assistant’s own starting instructions, so a name a customer could plausibly hear works better than an internal code.
Kooday derives an internal id from the name behind the scenes; you never see or choose it. Two consequences worth knowing:
- The name needs at least one a–z letter or digit. A name written only in Malayalam or Devanagari script is refused with “The assistant’s name must contain at least one latin letter or digit (a–z, 0–9) — it is used to build its internal id.” Give it a latin name and let the instructions set the language it actually speaks.
- Two assistants can share a name. Nothing stops you, and the second quietly gets a numbered id — so the picker shows Sales — sales and Sales — sales2, which nobody on your team can interpret. Give them different names.
Click Create. You land on the new assistant with a message: “Front Desk created — write its instructions to bring it live.” In the selector at the top it appears as Front Desk — frontdesk (draft).
Step 2 — Write its instructions, and publish
From the assistant’s card, click Open studio to reach Prompt Studio — its dedicated screen. The Instructions pane is where a draft becomes an assistant. It carries the subtitle “How this assistant should behave, on every channel — identity, greeting style, do’s and don’ts.”
Who this assistant is
Above the editor is a card with two fields — its own name and how it opens — and they belong to this assistant alone, not to your business. Full walkthrough of both fields: Prompt Studio → Who this assistant is.
Both fields save as a draft, like everything else here, and reach customers when you Publish. They are compiled into the instructions below, in a block marked as generated — your own text is never touched, and editing inside that block does not stick.
There are two buttons, and the difference is the whole point.
| Button | What it does |
|---|---|
| Save draft | Stores your text. Changes nothing a customer hears. |
| Publish | Makes it what the assistant actually says, from that moment. |
The line under them says it plainly: “Saving never changes what your assistant says — Publish does.” Above them you get the current state — Nothing published yet, or Live: v3 · unpublished draft.
Publishing is what brings a new assistant to life
There is no “activate” button. Publishing the instructions on a draft is the activation. Kooday re-runs the setup check the moment you publish, and if it passes, the assistant flips from draft to live on its own.
If the check does not pass, your text is still published — but the assistant stays a draft until the problems are fixed. The Readiness tab back on Bots tells you what they are.
Write behaviour, not a script
Instructions describe how it works: who it is, what it may promise, what it must never do, what to do when it does not know. Facts belong in your knowledge base and prices belong in your catalogue — an instruction block stuffed with prices goes stale the week you change them.
⚠️ A typo in a
{{TOKEN}}blocks the publish. If you write something that looks like a fill-in slot Kooday does not recognise, the save warns “Draft saved, but publish will refuse it” and lists the offending tokens. Fix the typo, or ask us to set that token up.
You can undo. History lists every version, Restore brings an older published one back, and Unpublish stops the assistant using it at all — with the warning “Unpublish this content? Your assistant stops using it immediately; drafts are kept and you can publish again later.”
Step 3 — The setup check
The Readiness tab holds one card, Setup check, and one button, Validate setup. It “Verifies the bot’s prompt templates and tool bindings exist and are wired correctly — the same checks the platform runs before a call.”
You do not have to remember to run it — it re-runs on every change and at restart, and the tab shows the last result with Last checked underneath. Click it when you want a fresh answer right now.
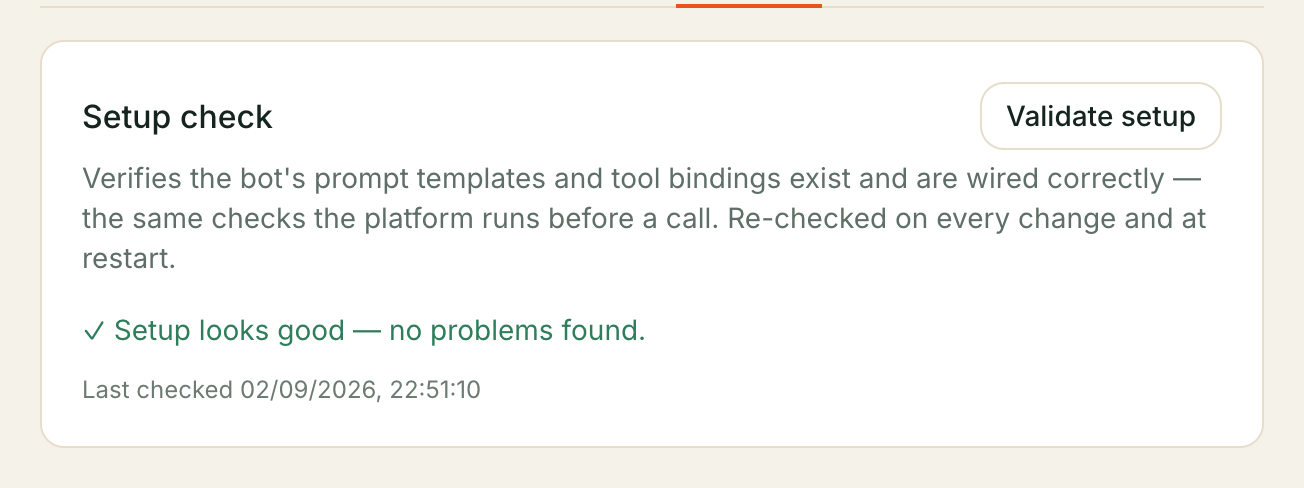
Four states, and only one of them needs you:
| What you see | What it means |
|---|---|
| Not validated yet — click “Validate setup” to check this bot. | It has never been checked. Click it. |
| ✓ Setup looks good — no problems found. | Nothing to do. |
| No blocking errors, but 2 warnings below. | It will work. The warnings are worth reading once. |
| 3 errors — this bot will fail its calls until fixed. | It is broken and calls will fail. |
The badge beside the assistant reads Ready, Has issues or Not checked to match.
Most errors here are platform wiring rather than anything you typed. Two are yours to fix, and both name themselves plainly:
- “…is not a language this assistant can speak — it would answer in English instead.” The language on the assistant is not one we serve (often a typo). Pick a supported one. Leaving the language as mixed is fine and is never flagged — that means “follow the customer”.
- “…is not a voice ‹provider› offers any more.” A warning, not an error: calls still go through in the default voice. Pick a current voice when convenient.
Most of what shows up here is yours to fix. Occasionally the problem is on our side — a shared building block the platform maintains, not anything on your assistant. When that happens the panel says so plainly (never a raw technical message) and offers a Report to Kooday button that sends us the details in one click — no need to copy and paste the wording yourself.
Step 4 — Channels, and the surprise
The Channels card on the Configuration tab is where an assistant reaches actual customers.
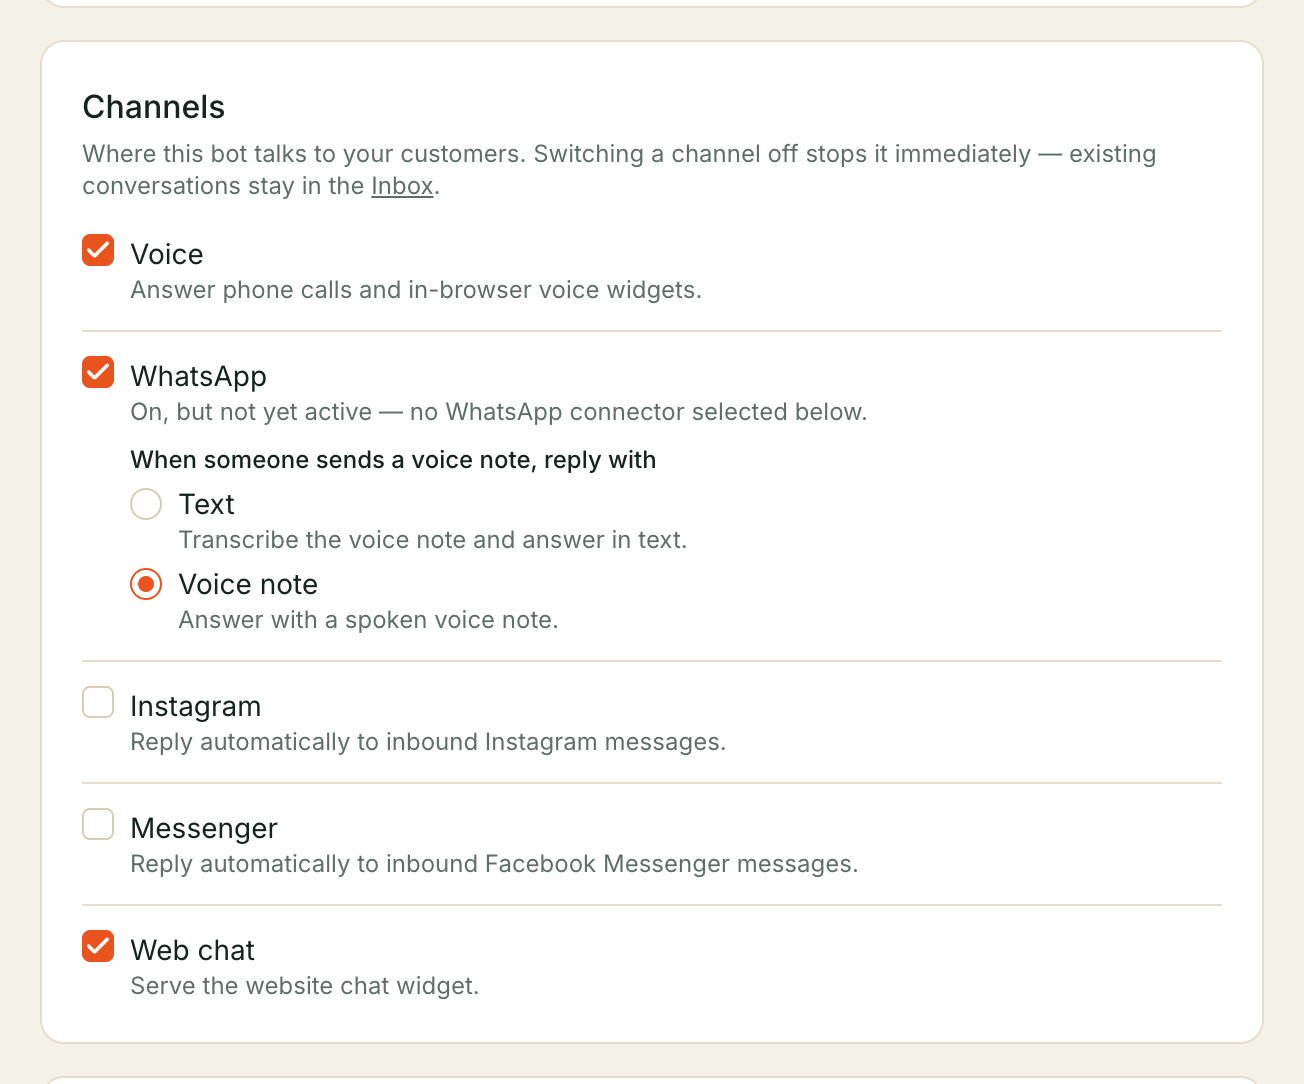
Five rows:
| Channel | What switching it on does |
|---|---|
| Voice | Answer phone calls and in-browser voice widgets. |
| Reply automatically to inbound WhatsApp messages. | |
| Reply automatically to inbound Instagram messages. | |
| Messenger | Reply automatically to inbound Facebook Messenger messages. |
| Web chat | Serve the website chat widget. Once this assistant also has a working, linked WhatsApp number, its website chat offers visitors a Continue on WhatsApp button by default — see Continue on WhatsApp for what that does and how to switch it off. |
⚠️ A brand-new assistant has every one of these switched off — and most of them locked. This is deliberate, and it is the opposite of what people expect from a wizard that just said “created”. The locked message tells you what to do next, and it is different depending on the channel:
- WhatsApp, Instagram, Messenger show “Connect through Meta sign-in to enable” with a link to Integrations — this is genuinely something you can do yourself, no administrator needed. See Connecting a channel for the Meta sign-in walkthrough.
- Voice shows a greyed-out box reading “Contact your administrator to enable this channel” — a phone number is still something Kooday sets up with you.
Web chat is the one you may be able to switch on yourself with no lock at all, and only if your plan includes it.
That is the honest shape of self-serve creation today: you can build an assistant end to end, and connect it to WhatsApp/Instagram/Messenger yourself through Meta sign-in — a phone number is still something Kooday does with you.
Two rules that catch people out:
- You cannot switch a channel on while it is still a draft. Publish the instructions first. Channel changes on a draft are rejected.
- Switching a channel off always works, immediately, whatever your plan says. Existing conversations stay in your Inbox; the assistant simply stops answering new ones. There is no “pause” that is gentler than this and none is needed.
On, but not actually on
WhatsApp has one more state, and the card says so: “On, but not yet active — no WhatsApp connector selected below.” The switch is on, but no WhatsApp account is bound to this assistant, so nothing reaches it. Pick a connector further down the same tab.
Instagram and Messenger have the same trap without the warning. Switching either on with nothing wired behind it looks successful and does nothing. Verify with a real message before you believe it.
Answering voice notes
Once WhatsApp is on, a small extra choice appears: “When someone sends a voice note, reply with” — Text (Transcribe the voice note and answer in text) or Voice note (Answer with a spoken voice note). Text is the safer default; voice notes feel personal but cost more and cannot be skim-read.
Step 5 — Test it before anyone else does
The Live test tab appears once Voice or Web chat is switched on, and holds whichever applies.
Test this bot places a real call from your browser: “Place a call from your browser. Allow microphone access when prompted — you’ll hear the bot through your speakers and it hears you.” Click Start call, talk to it, Hang up. Tick Record this call and you get a Download recording afterwards — the file stays in your browser. It runs the real call pipeline, so what you hear is what a customer hears.
Test the chat bot is the typed equivalent: “the same brain that answers WhatsApp and web chat. The bot follows the conversation, so you can test a multi-step flow; Clear starts a fresh one. Nothing here is saved.”
⚠️ The chat tester has a tick box that makes it real. “Run this bot’s real tools” is off by default, and the help text is not being dramatic: “When on, this test fires the bot’s real webhooks, bookings, and CRM writes against your live systems — and the turn is recorded in the audit log.” Leave it off unless you specifically mean to fire a real booking.
If the tab says “Live tester not available”, the in-browser tester is not switched on for your server — tell us and we will enable it.
Living with an assistant you already have
Everything above except the create dialog applies to an assistant Kooday built for you. A few things only matter once one is running.
The Configuration tab, field by field
Most of what an assistant answers with is yours to change directly, inline, on the Configuration tab — click a value and it saves the moment you leave the field (or flip the switch, for a toggle). There is no separate Save button per field.
| Field | What it controls |
|---|---|
| Name | What your team calls it in the dashboard. Not what it calls itself on a call — that is the How it opens field on Prompt Studio. |
| Phone number | The number this assistant answers on, in E.164. Only shown once Voice is on. See Connect your Exotel account for how it is validated against a connected credential. |
| Language | A language name (e.g. malayalam), or mixed to follow the customer. In chat, the assistant also mirrors the script the customer writes in: Malayalam script gets Malayalam script back, Manglish (Malayalam typed in English letters) gets Manglish back. There is nothing to configure — it follows each message. |
| Default inbound language | The language an inbound call starts in, before the customer says anything. Voice only. |
| Max call length (seconds) | The hard cap on how long a single call may run. Voice only; must be a positive number. |
| Recording | On or off — a consent decision, not a technical one. Decide it against how you tell callers you record, not against whether the transcripts are useful. |
| Knowledge search | Whether this assistant may search your knowledge base mid-conversation. Off is a real, supported state — some assistants should only use what you told them directly. |
| Voice engine, provider and voice | Which speech engine this assistant runs on, and — for the cascade engine — which speech-to-text, language model and text-to-speech provider it uses. See below. |
| Persona instructions | Free-text notes layered into this assistant’s prompt, on top of its bound persona. Optional. |
| Tools | Read-only. The list of tools an assistant can call is set by Kooday, not from here. |
A plain team member (not an admin) sees every value on this list, but cannot
edit any of them — the row renders as text rather than a control. Only
tenant_admin (and Kooday staff) can change a bot’s configuration.
Voice engine and providers
Every voice-capable assistant runs on one engine:
| Engine | What it is |
|---|---|
| Gemini Live (streaming) | One model handles listening, thinking and speaking together. |
| Cascade (STT → LLM → TTS) | Three separate steps you can mix and match — pick your own speech-to-text, language model and text-to-speech provider, each independently, or leave any of them on Default. |
| OpenAI Realtime (streaming) | A fused streaming engine, with its own model and reasoning-effort pickers. |
| Azure Realtime (streaming) | Same shape as OpenAI Realtime, on Azure’s models. |
The two Realtime engines need a plan that includes premium voice. If your plan does not, they simply do not appear in the Engine dropdown. If a Realtime engine was set on your assistant before your plan changed, the dropdown still shows it — labelled “(current — not on your plan)” and disabled — so the picker never lies about which engine is actually answering calls, even though you cannot re-select it.
Switching the Engine changes which of the other fields appear: Cascade shows a speech-to-text/language-model/text-to-speech provider picker plus a voice; the two Realtime engines show a voice, a model and a reasoning-effort picker; Gemini Live shows only a voice. Default on any provider or voice field means “use the platform’s current default for this engine” — it is a real, recommended choice, not a placeholder you need to fill in.
Voice changes apply to the assistant’s next call, not one already in progress.
Notifications wires a WhatsApp message this assistant can send after a call finishes — to the caller, not to you. It appears only for assistants that take calls, and it is a completely different thing from the WhatsApp channel — one sends the caller a summary of their own call, the other lets an assistant answer your customers day to day. They were one switch once and it was a mistake.
Three modes: Off sends nothing. On request sends only when the caller asked, during the call, to get the details on WhatsApp. Always sends after every inbound call with a reachable number (an extra tick sends after outbound calls too). Whichever mode is on, the message goes only to the number the caller called from (or that called them) — never to a number they merely say during the call, because Kooday cannot confirm they own it.
⚠️ On request needs a field your assistant does not collect by default. The mode only sends when the call’s summary record carries a “the caller agreed to WhatsApp follow-up” fact — a field named
wants_whatsapp— set to true, and that field is not part of any assistant’s summary until you add it yourself under Add your own fields (see Wording, transcripts and call outcomes). Until you do, On request never sends, on any assistant. Your assistant is also never told which mode is switched on, so it can promise a WhatsApp summary on a call where nothing goes out — or fail to offer one it could actually send.
A caller who says “send it to this other number” is not obeyed: the summary still goes to the number they called from. If there is no real caller number (a web-widget or test call), nothing is sent.
You cannot deactivate or delete an assistant yourself. Switching every channel off is the self-serve equivalent and it is complete — the assistant answers nobody. Ask us for the rest.
Troubleshooting
The Create assistant button does nothing, or errors
Creating assistants needs admin access. The button is shown to everyone but only admins can use it.
I published my instructions and it is still a draft
The setup check did not pass. Open Readiness, click Validate setup, and read the errors. Publishing only activates an assistant that is otherwise ready.
There is no Live test tab
It appears only when Voice or Web chat is on. A draft has neither, so publish the instructions and switch a channel on first.
The channel switch is greyed out
That channel has not been granted to this assistant — the row says “Contact your administrator to enable this channel.” It is not something a setting on your side can fix.
I switched WhatsApp on and nothing happens
Look at the row again. If it reads “On, but not yet active — no WhatsApp connector selected below”, the switch is on but no WhatsApp account is bound to this assistant. Instagram and Messenger fail the same way without saying so.
I changed something on a draft and it did not save
Draft assistants reject configuration changes. Publish the instructions to bring it live, then change the setting.
Where to go next
- Connecting a channel — getting it onto WhatsApp, your website, or a phone number.
- Your knowledge base — the documents it answers from.
- Selling from your catalogue — so it quotes real prices.
- Setting up your sales pipeline — turning the good conversations into deals.
Still stuck? We answer support mail the same working day.
Email support